Showing posts with label Template. Show all posts

Blogger Store, an E-Commerce Template

March 10, 2012 4 comments

Blogger Store

preview

download


Blogger Store created specially for bloggers who have a commercial blog, designed professionally using the latest version ShoppingCart (v2.2) of wojo team.

You can feel the real taste deal using Paypal or Google Checkout. settings are available for TaxRate, ShippingCost and more. With the automatic slideshow featuring recent post and also jQuery sliding menus and socialbookmark with fadein and fadeout effect.

Main Features
  • Shopping cart ( SimpleCart.js v2.2 )
  • Automatic Slider
  • jQuery Sliding Menu
  • Social Share Widget


Stumble
Delicious
Technorati
Facebook
Digg

Premium Magazine III

June 15, 2009 4 comments

Premium Magazine III, Blogger Magazine Templates


FEATURES:

• FrontPage and Single Page
• Auto Summary, Autoreadmore and Thumbnail Post
• Continues Scrolling Featured Articles.
• Related Post Widget
• Printer Friendly
• Breadcrumbs
• Drop Cap
• Social Bookmarking Buttons
• PDF Conversion Articles
• Best viewed using Firefox 3, Google Chrome, Opera, Safari and Internet Explorer 8+

PROCEDURE AND GUIDELINES FOR INSTALLATION:

|


Overview:

O bviously Premium Magazine III Template is a child theme of my previous template Premium Magazine II, but still there are new features that I included and I have also minimize the use of javascript on some of the sidebars.

It is also my first time to use these kinds of color combinations, a darker shade as the body background and plain white on the main body with a touch of royal blue.

Pre-Set-up Installation Detail:

First, be sure to download PreMag3.rar and check if there are no errors appearing when clicking the file.
• Unzip the file on a separate folder.
• Upload Javascript and CSS File in a credible hosting site. We’ll hotlink these files later. (Javascript File: autoreadmore.js, jd.gallery.js, jd.gallery.css, mootools.v1.11.js, Relatedposts.js,)
• Now, Log-in to your Blogger Account.
• Go to LAY-OUT, select Edit HTML, and then click “Choose File” button.
• Browse PreMag3.xml from the unzipped folder.
• If found, select it then click “Upload” button.

INSTALLATION OF THE FIELDS:

MENUCONTAINER:


• Go to LAY-OUT, Edit HTML
• Using Control F in your keyboard, find <div id='menucontainer'>
• Replace all links and codes.

Menucontainer: <li><a expr:href='/'> HOME </a></li>
• Save

FEATURE ARTICLES:


• Go to LAY-OUT, Edit HTML
• Using Control F in your keyboard, find all this codes:

<script src='http://HOSTING-SITE-LINK/Relatedpost.js' type='text/javascript'/> <script type='text/javascript'> var thumbnail_mode = &quot;no-float&quot; ; summary_noimg = 300; summary_img = 280; img_thumb_height = 150; img_thumb_width = 150; </script>

<script src='http:// HOSTING-SITE-LINK /autoreadmore.js' type='text/javascript'/>

<script src='http:// HOSTING-SITE-LINK /mootools.v1.11.js' type='text/javascript'/>

<script src='http:// HOSTING-SITE-LINK /jd.gallery.js' type='text/javascript'/>

<link href='http:// HOSTING-SITE-LINK /jd.gallery.css' media='screen' rel='stylesheet' type='text/css'/>


• Replace all bold text by copying links of the Javascript and CSS file that we uploaded earlier.
• Again using Control F in your keyboard, find this codes: <div id='myGallery'>

• Below that, you will see:

<div class='imageElement'>

<h2>1914 translation by H. Rackham</h2>

<p>On the other hand, we denounce with righteous indignation and dislike men who are so beguiled and demoralized by the charms of pleasure of the moment...</p>

<a class='open' href='http://premium-mag2.blogspot.com/2009/05/1914-translation-by-h-rackham.html' title='Read More'/>

<img alt='' class='full' src='https://blogger.googleusercontent.com/img/b/R29vZ2xl/AVvXsEhtlrjfG3UmVcqeIlyOQaOYIMQl-j2UPNbtu4LiOjmSZR0KCaFoR7BUmCAwPUBrzcQp6WqbtLBuWrGBYJU1MZOV0d5F-ZAHu-A6PAzTubB7RbJazSpVcgJOwdMqa71qPjwGuCpNGstpNLs/s1600/P1060030.JPG'/>

<img alt='' class='thumbnail' src='https://blogger.googleusercontent.com/img/b/R29vZ2xl/AVvXsEhtlrjfG3UmVcqeIlyOQaOYIMQl-j2UPNbtu4LiOjmSZR0KCaFoR7BUmCAwPUBrzcQp6WqbtLBuWrGBYJU1MZOV0d5F-ZAHu-A6PAzTubB7RbJazSpVcgJOwdMqa71qPjwGuCpNGstpNLs/s150/P1060030.JPG'/>

</div>
• Please follow below pattern when editing the default codes and also for adding some set of this Featured Articles.

<div class='imageElement'>

<h2> POST TITLE </h2>

<p> EXCERPT OF POST </p>

<a class='open' href=' HTML LINK OF POST' title='Read More'/>

<img alt='' class='full' src='HTML LINK OF ATTACHED PHOTOS (BIGGER SIZE)'/>

<img alt='' class='thumbnail' src=' HTML LINK OF ATTACHED PHOTOS (SMALLER SIZE) '/> </div>
Are you aware of the HTML code of your photos when you upload it on your post? Let us take example on one of my article.

The HTML code of this is:

<a onblur="try {parent.deselectBloggerImageGracefully();} catch(e) {}" href="https://blogger.googleusercontent.com/img/b/R29vZ2xl/AVvXsEhtlrjfG3UmVcqeIlyOQaOYIMQl-j2UPNbtu4LiOjmSZR0KCaFoR7BUmCAwPUBrzcQp6WqbtLBuWrGBYJU1MZOV0d5F-ZAHu-A6PAzTubB7RbJazSpVcgJOwdMqa71qPjwGuCpNGstpNLs/s1600-h/P1060030.JPG"><img style="display:block; margin:0px auto 10px; text-align:center;cursor:pointer; cursor:hand;width: 320px; height: 240px;" src="https://blogger.googleusercontent.com/img/b/R29vZ2xl/AVvXsEhtlrjfG3UmVcqeIlyOQaOYIMQl-j2UPNbtu4LiOjmSZR0KCaFoR7BUmCAwPUBrzcQp6WqbtLBuWrGBYJU1MZOV0d5F-ZAHu-A6PAzTubB7RbJazSpVcgJOwdMqa71qPjwGuCpNGstpNLs/s320/P1060030.JPG" border="0" alt=""id="BLOGGER_PHOTO_ID_5331875133339189954" /></a>
Only that bold text is the code that we should get for hotlinking. The blue text is the size of the photo. Here are some sizes that Blogger accept for hotlinking:

s150, s320, s400, s800 and s1600

• Save

FEEDS:


• Go to LAY-OUT, Edit HTML
• Using Control F in your keyboard, find all this codes:

<li><a href='http://YOUR-BLOGNAME.blogspot.com'>Content Feed</a></li>
<li><a href='http://YOUR-BLOGNAME.blogspot.com/?feed=comments-rss2'>Comment Feed</a></li>

• Replace YOUR-BLOGNAME with your own link.
• Save

DROP CAP:

Drop Cap is a big letter that found on the first part of a paragraph or a sentence. It is not often use to a blog or even in a website, but with this template I manage to incorporate this feature.

• Go to SETTING, select “Formatting”.
• Add this codes on the Post Template:

<span class="drop-cap">

</span>
• Save

When you post an article, be sure to embed the first letter between those two (2) codes:

<span class="drop-cap">T </span>he quick brown fox�.

FEATURE VIDEO:


This field is optional or it can be replaced with other widgets that you want to include. But if you prefer to add this with your own video, then you should be familiar with the codes of embedding videos. There are lots of sites now that offer video embedding. One of them is the famous Youtube. But do you know how to customize the size of your video?

Example:

<object width="300" height="244"><param value="http://www.youtube.com/v/hkwN_48ycTU&hl=en&fs=1" name="movie"/><param value="true" name="allowFullScreen"/><param value="always" name="allowscriptaccess"/><embed allowscriptaccess="always" width="300" src="http://www.youtube.com/v/hkwN_48ycTU&hl=en&fs=1" allowfullscreen="true" height="244" type="application/x-shockwave-flash"></embed></object>


Since the width of our sidebar is only 320px, make it sure also that your video should not go beyond this dimension or else it might overflow. Those bold texts on the codes are the safest sizes for this field. Take a look on the Live Demo

ADS

• Go to “LAY-OUT / PAGE ELEMENTS
• Click “Add a Gadget
• Select “Adsense” (if you don’t have a precoded ads, choose 125 x 125)
• Or “HTML” (if you have, paste those codes.)
• Then, Save


FOOTER LINKS:


• Go to LAY-OUT, select Page Element
• Click “Add Gadget
• Select “Bloglist” or “Link List” from the listed widgets.
• Fill-up
• Save


FOLLOWERS:


• Go to “LAY-OUT / PAGE ELEMENTS
• Click “Add a Gadget
• Select “Followers
• Then, Save


RECENT POSTS:


• Go to “LAY-OUT / PAGE ELEMENTS
• Click “Add a Gadget
• Select “Feed
• Paste this code : http://YOUR-LINK.blogspot.com/feeds/posts/default
• Then, Save


RECENT COMMENTS


• Go to “LAY-OUT / PAGE ELEMENTS
• Click “Add a Gadget
• Select “Feed
• Paste this code: http://YOU-LINK.blogspot.com/feeds/comments/default
• Then, Save

Stumble
Delicious
Technorati
Facebook
Digg

Premium Magazine II

May 19, 2009 6 comments

Premium Magazine II, Blogger Magazine Templates

FEATURES:

• 3 Column Template
• FrontPage and Single Page
• Auto Summary and Thumbnail Post
• Cascading Menus
• Auto Label Pick-up and Feature Article
• DOMTAB Sidebar
• Continues Scrolling Featured Articles.
• Related Post Widget
• Breadcrumbs
• Drop cap
• Best viewed using Firefox 3, Google Chrome, Opera, Safari and Internet Explorer 8+

|


PROCEDURE AND GUIDELINES FOR INSTALLATION:


Overview:

This Premium Magazine II Template is a combination of my past two templates, the Arapaap and Structure. It was updated, enhanced and installed some powerful javascript to make it more attractive and useful to the user.

All the areas were all “self-generating fields” after installation except for the scrolling photos which need to be updated when a new feature article was published. This field is still under development and to be upgraded on the next version.

Pre-Set-up Installation Detail:

First, be sure to download PreMag2.rar and check if there are no errors appearing when clicking the file.
• Unzip the file on a separate folder.
• Upload Javascript and CSS File in a credible hosting site. (Javascript File: autoreadmore.js, jd.gallery.js, jd.gallery.css, mootools.v1.11.js, Relatedposts.js, vertical-label.js)
• Now, Log-in to your Blogger Account.
• Go to LAY-OUT, select Edit HTML, and then click “Choose File” button.
• Browse PreMag2.xml from the unzipped folder.
• If found, select it then click “Upload” button.

Now, you’re half-way done on installing this template.

INSTALLATION OF THE FIELDS:

MENUCONTAINER and LABELMENUCONTAINER:


• Go to LAY-OUT, Edit HTML
• Using Control F in your keyboard, find <div id='menucontainer'> and <div id='labelmenucontainer'>
• Replace all default links and codes.

Menucontainer: <li><a expr:href='/'> HOME </a></li>

Labelmenucontainer: (e.g. Arts – label)

<li><a href='#' title='View all posts filed under ....'>Arts</a>
<ul class='children'>
<li><a href='SUB-TITLE-LINK-ADDRESS' title='View all posts filed under .....'>Arts1</a> </li>
<li><a href='SUB-TITLE-LINK-ADDRESS' title='View all posts filed under .....'>Arts2</a> </li>
<li><a href='SUB-TITLE-LINK-ADDRESS' title='View all posts filed under .....'>Arts3</a> </li>
</ul>
</li>

• Save

FEATURE ARTICLES:
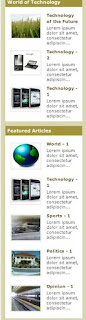

• Go to LAY-OUT, Edit HTML
• Using Control F in your keyboard, find all this codes:
<script src='http://HOSTING-SITE-LINK/Relatedpost.js' type='text/javascript'/> <script type='text/javascript'> var thumbnail_mode = &quot;no-float&quot; ; summary_noimg = 230; summary_img = 200; img_thumb_height = 100; img_thumb_width = 100; </script>

<script src='http:// HOSTING-SITE-LINK /autoreadmore.js' type='text/javascript'/>

<script src='http:// HOSTING-SITE-LINK /mootools.v1.11.js' type='text/javascript'/>

<script src='http:// HOSTING-SITE-LINK /jd.gallery.js' type='text/javascript'/>

<link href='http:// HOSTING-SITE-LINK /jd.gallery.css' media='screen' rel='stylesheet' type='text/css'/>

• Replace all HOSTING-SITE-LINK by simply copying links of the Javascript and CSS file that we uploaded earlier.
• Again using Control F in your keyboard, find this codes: <div id='myGallery'>

• Below that, you will see:

<div class='imageElement'>

<h2>1914 translation by H. Rackham</h2>

<p>On the other hand, we denounce with righteous indignation and dislike men who are so beguiled and demoralized by the charms of pleasure of the moment...</p>

<a class='open' href='http://premium-mag2.blogspot.com/2009/05/1914-translation-by-h-rackham.html' title='Read More'/>

<img alt='' class='full' src='https://blogger.googleusercontent.com/img/b/R29vZ2xl/AVvXsEhtlrjfG3UmVcqeIlyOQaOYIMQl-j2UPNbtu4LiOjmSZR0KCaFoR7BUmCAwPUBrzcQp6WqbtLBuWrGBYJU1MZOV0d5F-ZAHu-A6PAzTubB7RbJazSpVcgJOwdMqa71qPjwGuCpNGstpNLs/s1600/P1060030.JPG'/>

<img alt='' class='thumbnail' src='https://blogger.googleusercontent.com/img/b/R29vZ2xl/AVvXsEhtlrjfG3UmVcqeIlyOQaOYIMQl-j2UPNbtu4LiOjmSZR0KCaFoR7BUmCAwPUBrzcQp6WqbtLBuWrGBYJU1MZOV0d5F-ZAHu-A6PAzTubB7RbJazSpVcgJOwdMqa71qPjwGuCpNGstpNLs/s150/P1060030.JPG'/>

</div>


• Please follow below pattern when editing the default codes and also for adding some set of this Featured Articles.

<div class='imageElement'>

<h2> POST TITLE </h2>

<p> EXCERPT OF POST </p>

<a class='open' href=' HTML LINK OF POST' title='Read More'/>

<img alt='' class='full' src='HTML LINK OF ATTACHED PHOTOS (BIGGER SIZE)'/>

<img alt='' class='thumbnail' src=' HTML LINK OF ATTACHED PHOTOS (SMALLER SIZE) '/> </div>


Are you aware of the HTML code of your photos when you upload it on your post? Let us take example on one of my article.


The HTML code of this is:

<a onblur="try {parent.deselectBloggerImageGracefully();} catch(e) {}" href="https://blogger.googleusercontent.com/img/b/R29vZ2xl/AVvXsEhtlrjfG3UmVcqeIlyOQaOYIMQl-j2UPNbtu4LiOjmSZR0KCaFoR7BUmCAwPUBrzcQp6WqbtLBuWrGBYJU1MZOV0d5F-ZAHu-A6PAzTubB7RbJazSpVcgJOwdMqa71qPjwGuCpNGstpNLs/s1600-h/P1060030.JPG"><img style="display:block; margin:0px auto 10px; text-align:center;cursor:pointer; cursor:hand;width: 320px; height: 240px;" src="https://blogger.googleusercontent.com/img/b/R29vZ2xl/AVvXsEhtlrjfG3UmVcqeIlyOQaOYIMQl-j2UPNbtu4LiOjmSZR0KCaFoR7BUmCAwPUBrzcQp6WqbtLBuWrGBYJU1MZOV0d5F-ZAHu-A6PAzTubB7RbJazSpVcgJOwdMqa71qPjwGuCpNGstpNLs/s320/P1060030.JPG" border="0" alt=""id="BLOGGER_PHOTO_ID_5331875133339189954" /></a>


Only that bold text is the code that we should get for hotlinking. s320 is the size of the photo. Here are some sizes that Blogger accept for hotlinking:

s150, s320, s400, s800 and s1600

• Save

• Go to LAY-OUT, Select Page Element
• Add this code:

<script language="JavaScript"> imgr = new Array();

imgr[0] = "http://i39.tinypic.com/4keej5.jpg";
imgr[1] = "http://i43.tinypic.com/2q2lkoz.jpg";
imgr[2] = "http://i43.tinypic.com/2ef4zrl.jpg";
imgr[3] = "http://i42.tinypic.com/2nrhkbd.jpg";

showRandomImg = false;
tablewidth = 199;
cellspacing = 8;
borderColor = "#ffffff";
bgTD = "#ffffff";
imgwidth = 75;
imgheight = 65;
fntsize = 11;
fntsize1 = 2;
acolor = "#5D502C";
bcolor = "#000066";
aBold = true;
icon = " ";
text = "comments";
showPostDate = false;
summaryPost = 50;
summaryFontsize = 11;
summaryColor = "#444444";
icon2 = " ";
numposts = 5;
label = "Feature";
home_page = "http://HOMEPAGE.blogspot.com/"; </script>

<script src="http:// HOSTING-SITE-LINK /vertical-label.js" type="text/javascript"></script>


• Replace this default codes: prefer number of post to display (numposts), your label (label), home_page; and paste the link of the javascript that you uploaded earlier.
• Save

Do this for the rest of the fields.

DROP CAP:
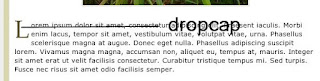

Drop Cap is a big letter that found on the first part of a paragraph or a sentence. It is not often use to a blog or even in a website, but with this template I have manage to incorporate this feature.

• Go to SETTING, select “Formatting”.
• Add this codes on the Post Template:
<span class="drop-cap"> </span>
• Save

When you post an article, be sure to embed the first letter between those two (2) codes:

<span class="drop-cap">T </span>he quick brown fox�.

FEATURE VIDEO:

This field is optional or it can be replace with other widgets that you want to include. But if you prefer to add this with your own video, then you should be familiar with the codes of embedding videos. There are lots of sites now that offer video embedding. One of them is the famous Youtube. But do you know how to customize the size of your video?

Example:
<object width="300" height="244"><param value="http://www.youtube.com/v/hkwN_48ycTU&hl=en&fs=1" name="movie"/><param value="true" name="allowFullScreen"/><param value="always" name="allowscriptaccess"/><embed allowscriptaccess="always" width="300" src="http://www.youtube.com/v/hkwN_48ycTU&hl=en&fs=1" allowfullscreen="true" height="244" type="application/x-shockwave-flash"></embed></object>

Since the width of our sidebar is only 320px, make it sure also that your video should not go beyond this dimension or else it might overflow. Those bold texts on the codes are the safest sizes for this field. Take a look on the Live Demo.

LINKS:
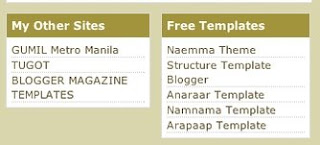

• Go to LAY-OUT, select Page Element
• Click “Add Gadget”
• Select “Blog List” or “Link List” from the listed widgets.
• Fill-up
• Save

SIDEBAR TABS:
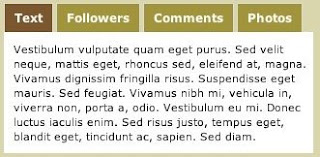

Domtab offers a clean and multi-handle field in just one column. Tabs performs the task separately by clicking individually and they show different results accordingly.

This field has a similarity with the above field (Links). Fill-up those tabs using the above procedure but use different widgets or even paste your own codes.

---
Keep coming back, next time I will share also my next template: PREMIUM MAGAZINE I

Stumble
Delicious
Technorati
Facebook
Digg

Naemma Theme

April 30, 2009 0 comments

Naemma Theme

Naemma Theme, a portfolio theme that is similar to Anaraar Template with two(2) column, feature slider image, a welcome message board, rounded corners menu and expanded article area.

|


HOW TO SET-UP NAEMMA THEME?

After downloading Naemma Theme.rar, extract all the files in a separate folder.

Log-in to your Blogger Account, then go to “LAY-OUT”, click “Edit HTML”
Click "Choose File box" select   “Naemma Theme.xml” then "Upload"
Uploading the .xml file is not a a guarantee that the template will work the same as the demo if you will not upload also the remaining files specially the Feature Slider Image.


FEATURE SLIDER IMAGE:

To make this feature works like the same as you can see on the Live Demo, first upload all the Javascript Files (easySlider1.5.js, jquery.js and Relatedpost.js) that you extracted from the zip file. Google Pages, Fileave.com and File Den are some of the free site that hosted Javascript Files.


1. First, open “Naemma Theme” using WordPad or Adobe Dreamweaver.

2. Using Control F in your Keyboard, locate this code:

<script src='http://YOUR-HOSTING-PARTNER/Relatedpost.js' type='text/javascript'/> <script src='http://YOUR-HOSTING-PARTNER/jquery.js' type='text/javascript'/> <script src='http://YOUR-HOSTING-PARTNER/easySlider1.5.js' type='text/javascript'/>

3. Replace bold text and get the links of the Javascript Files that you uploaded.
4. Save.

To change the default images from the template, search this code  <div id='slider'>, right after this you will see;


When you edit or you want to add more feature article, just follow below pattern. You can include as many as you want.

<a href='http://LINK-OF-FILE ' title='TITLE OF FILE'> <img src='http://IMAGE-LINK.jpg'/></a>


MENU:


1. Search this code <div id='menu'>
2. You may find text like this:

<li><a href='/' title='HOMEPAGE'><strong>HOME</strong><br/>blog</a></li>
<li><a href='http://www.blogger.com/profile/01412953850148714207' title='ABOUT US'><strong>ABOUT</strong><br/>me</a></li>
<li><a href='#' title='SERVICES'><strong>SERVICES</strong><br/>our products</a></li>
<li><a href='#' title='PORFOLIO'><strong>PORTFOLIO</strong><br/>our work</a></li>
<li><a href='http://www.formspring.com/forms/?590105-FJdncKWbTZ' title='CONTACT US'><strong>CONTACT</strong><br/>more info</a></li>

3. Replace my default text (bold) and links to your own code.
4. Save


READ FULL STORY:


Pre-encoded “Read Full Story>>” is not a guarantee to make this feature work properly. In order to get this;

• Go to “SETTING / FORMATTING” then copy and paste below codes to Post Template:

<div class="fullpost"> </div>

• Click "Save Setting"


When Posting, be sure to click “Edit Html” tab, then follow below pattern:


LABEL:

• Go to “LAY-OUT / PAGE ELEMENTS”

• Click “Add a Gadget”
• Select “Labels”
• Then, Save

RECENT POST:


• Go to “LAY-OUT / PAGE ELEMENTS”
• Click “Add a Gadget”
• Select “HTML/JavaScript” , then add this codes:

<script language="JavaScript" src="http://tools.bloggerbuster.com/headlines/feed2js.php?src=http%3A%2F%2Fnaemma-theme.blogspot.com%2Ffeeds%2Fposts%2Fdefault&amp;num=10" type="text/javascript"></script>

Replace my default blog address (bold text) with your own link. Then you can specify your desire quantity of title post, just replace the "10”.

• Then, Save.

SIDEBAR 1 “About Me”:


• Go to “LAY-OUT / PAGE ELEMENTS”
• Click “Add a Gadget”
• Select “Profile”
• Then, Save

SIDEBAR 2 “Follow me on”:


• Go to “LAY-OUT / PAGE ELEMENTS”
• Click “Add a Gadget”
• Select “HTML/JavaScript”, add below codes.

<a href="http://www.flickr.com/tugot"><img border="0" src="http://i40.tinypic.com/107rg5e.jpg"/></a><a href="http://feeds.feedburner.com/jfi7811"><img border="0" alt="SUBSCRIBE TO FEED" src="http://i44.tinypic.com/14bpcuv.jpg"/></a><a href="http://twitter.com/jfi7811" title="'Follow me on Twitter'"><img border="0" src=http://i40.tinypic.com/j0zltl.jpg/�></a>

Replace bold text with your own link.

• Then Save.

SIDEBAR 3 “Labels”:


This feature is already included in the template.

NOTE: Please keep the bottom credit link as a way of respect to the designer who spend time to create this free template.

Stumble
Delicious
Technorati
Facebook
Digg

Anaraar Template

April 20, 2009 2 comments


Anaraar Template, a portfolio template for Blogger account that has a simple front page but elegant style. Comprises of a single post on the front page which can be set-up in "Setting/Formatting" and five (5) thumbnails of Recent Posts. Single Post can also be expanded by clicking the title.

What makes this template stunning are the rounded corners that can be seen in the following areas: Menus, Main Part of the Post and the Search Tab located in the footer. And even the fixed photo background that serve as a decoration while we scroll on the other part of the blog.


HOW TO SET-UP AND CUSTOMIZE:

Menu:


<li><a href='#'>SERVICES</a></li>


You can edit links by simply inserting/replacing the # (number sign) and the title (example: SERVICES).

Single Post:

You can Set-up a Single Post in the Front Page by going to "SETTING/ FORMATTING" . Just type or replace the default number.

Recent Post:


The list of Recent Post in the right portion of the main can also be customize. Just search the following codes:

<script language='JavaScript'>
imgr = new Array();

imgr[0] = &quot;http://i39.tinypic.com/4keej5.jpg&quot;;
imgr[1] = &quot;http://i43.tinypic.com/2q2lkoz.jpg&quot;;
imgr[2] = &quot;http://i43.tinypic.com/2ef4zrl.jpg&quot;;
imgr[3] = &quot;http://i42.tinypic.com/2nrhkbd.jpg&quot;;

showRandomImg = true;

tablewidth = 290;
cellspacing = 5;
borderColor = &quot;#FF0000&quot;;
bgTD = &quot;#FF0000&quot;;

imgwidth = 75;
imgheight = 60;

fntsize = 12;
acolor = &quot;#FFFFFF&quot;;
aBold = true;
icon = &quot; &quot;;

text = &quot;comments&quot;;

showPostDate = false;

summaryPost = 50;
summaryFontsize = 11;
summaryColor = &quot;#666&quot;;
icon2 = &quot; &quot;;

numposts = 5;

home_page = &quot;http://anaraar-template.blogspot.com/&quot;;

</script>
<script src='http://......./recentposts_thumb_no_comments.js' type='text/javascript'/>

Replace the bold text with your own codes.

Download Javascript here. Save to your own hosting site then replace the above ".js" link.
Popular Post:

Insert this code on the first sidebar, below the main post:

<script type="text/javascript">
function pipeCallback(obj) {
document.write('<ul style="text-transform: capitalize;">');
var i;
for (i = 0; i < obj.count ; i++)
{
var href = "'" + obj.value.items[i].link + "'";
var item = "<li>" + "<a href=" + href + ">" + obj.value.items[i].title + "</a> </li>";
document.write(item);
}
document.write('</ul>');
}
</script>
<script src="http://pipes.yahoo.com/pipes/pipe.run?_render=json&_callback=pipeCallback&_id=a7d3195528df5e96181a3d2712266226&url=http%3A%2F%2Fanaraar-template.blogspot.com&num=30" type="text/javascript"></script>

Replace bold text with your own blog address.

Latest Post:


Insert this code on the second sidebar:

<script language="JavaScript" src="http://tools.bloggerbuster.com/headlines/feed2js.php?src=http%3A%2F%2Fanaraar-template.blogspot.com%2Ffeeds%2Fposts%2Fdefault&amp;num=10" type="text/javascript"></script>

Replace bold text with your own blog address.

Labels:


Label Cloud were pre-encoded so there's nothing to worry for this.

Stumble
Delicious
Technorati
Facebook
Digg

Structure Theme Blogger (V1.0)

April 9, 2009 1 comments


After the successful released of NAMNAMA TEMPLATE which took place the original plan launching of this new Structure Theme Blogger, finally I've finished and now I will share to you.

SUMMARY

Original Designer: Justin Tadlock
URL: http://justintadlock.com

Converted by: Jake F. Ilac
URL: http://magazine-templates.blogspot.com

Releasing Date: April 9, 2009


HOW TO SET-UP:

It is so easy to set-up this template because some of the field are self generating or self motivated after the first installation, you will not worry for the next update. Just follow the instructions.

TOP NAVIGATION MENU


<li>
<a href='/' title='Example'><span>Example</span></a></li>

Insert the url link on '/' and replace "Example" with the title of the link.


FEED


<a href='http://structure-template.blogspot.com/'>Subscribe by RSS</a>

Replace the website address with your own.


MAIN TAB (Label Tab)


  1. Click "Edit".
  2. Replace the following: label = "Entertainment"; with your own label; home_page = "http://structure-template.blogspot.com/"; and also the title <li><a href='#tab1'>Entertainment</a></li>
Follow this instruction for the rest of the remaining tabs. Copy and Paste below code:

<script language="JavaScript">
imgr = new Array();

imgr[0] = "http://i39.tinypic.com/4keej5.jpg";
imgr[1] = "http://i43.tinypic.com/2q2lkoz.jpg";
imgr[2] = "http://i43.tinypic.com/2ef4zrl.jpg";
imgr[3] = "http://i42.tinypic.com/2nrhkbd.jpg";

showRandomImg = true;

tablewidth = 560;
cellspacing = 10;
borderColor = "#ffffff";
bgTD = "#ffffff";

imgwidth = 250;
imgheight = 250;

fntsize = 13;
fntsize1 = 2;
acolor = "#000000";
bcolor = "#000066";
aBold = true;
icon = " ";

text = "comments";

showPostDate = false;

summaryPost = 300;
summaryFontsize = 13;
summaryColor = "#000000";
icon2 = " ";
numposts = 2;

label = "world";

home_page = "http://structure-template.blogspot.com/";

</script>
<script src="http://www.example.com/labelhorizontal_title_below_no.js" type="text/javascript"></script>

Download Javascript here. Save to your hosting site and replace the entire bolded link with your own link.


FEATURE POST


Follow the procedure in the Main Tab (similar). Copy and Paste below code:

<script language="JavaScript">
imgr = new Array();

imgr[0] = "http://i39.tinypic.com/4keej5.jpg";
imgr[1] = "http://i43.tinypic.com/2q2lkoz.jpg";
imgr[2] = "http://i43.tinypic.com/2ef4zrl.jpg";
imgr[3] = "http://i42.tinypic.com/2nrhkbd.jpg";

showRandomImg = true;

tablewidth = 570;
cellspacing = 8;
borderColor = "#ffffff";
bgTD = "#ffffff";

imgwidth = 300;
imgheight = 250;

fntsize = 12;
fntsize1 = 2;
acolor = "#000000";
bcolor = "#000066";
aBold = true;
icon = " ";

text = "comments";

showPostDate = true;

summaryPost = 200;
summaryFontsize = 13;
summaryColor = "#000000";
icon2 = " ";
numposts = 1;

label = "features";

home_page = "http://structure-template.blogspot.com/";

</script>
<script src="http://www.example.com/feature.js" type="text/javascript"></script>


Download Javascript here. Save to your hosting site and replace the entire bolded link with your own link.

SIDEBAR TAB


LATEST - Replace url "structure-template.blogspot.com" with your own blog url. Copy and Paste this codes:

<script language="JavaScript" src="http://tools.bloggerbuster.com/headlines/feed2js.php?src=http%3A%2F%2FYOUR-BLOG-ADDRESS WITHOUT HTTP%2Ffeeds%2Fposts%2Fdefault&amp;num=10" type="text/javascript"></script>

POPULAR - Replace url "structure-template.blogspot.com" with your own blog url.

<script type="text/javascript">
function pipeCallback(obj) {
document.write('<ul style="text-transform: capitalize;">');
var i;
for (i = 0; i < obj.count ; i++)
{
var href = "'" + obj.value.items[i].link + "'";
var item = "<li>" + "<a href=" + href + ">" + obj.value.items[i].title + "</a> </li>";
document.write(item);
}
document.write('</ul>');
}
</script>
<script src="http://pipes.yahoo.com/pipes/pipe.run?_render=json&_callback=pipeCallback&_id=a7d3195528df5e96181a3d2712266226&url=http%3A%2F%2FYOUR-BLOG-ADDRESS WITHOUT HTTP&num=30" type="text/javascript"></script>

SECTIONS - Click "Add Gadget" select Labels, then Save.

Using Control F in your keyboard, Search this code: 
<script src='http://www.example.com/newscriptabs.js' style='text/javascript'/> <script type='text/javascript'>tabtampil_inisial(&#39;TabTampil&#39;);</script>

Download your own .js file here, save it on your hosting site and replace the bolded text link.

FLICKR PHOTOS


Copy and Paste this code:

<script src="http://www.flickr.com/badge_code_v2.gne?show_name=1&count=8&display=random&size=s&layout=y&source=user&user=26574442@N02" type="text/javascript"></script>

<p 5px padding align="right"><a href="http://www.flickr.com/photos/gumilmetromanila">View Flickr photostream >></a> </p>

If you have a flickr account, you can get your user id at http://idgettr.com/ and replace my own default.


----
I hope you like my version of this wonderful wordpress theme, again keep visiting here or subscribe on my feeds to be updated what are the latest template that I have.

Stumble
Delicious
Technorati
Facebook
Digg