Showing posts with label Widget. Show all posts

Creating Blogger Pages; Static No More

February 14, 2010 1 comments

Creating Blogger Pages; Static No More


One of the main concern of all the blogger subscribers in Blogger is to have pages that is similar to Wordpress. This suggestion was one of the top request during the survey that they conducted last year. Before, bloggers were using static pages but now no need to do this.

Pages in Blogger started as a draft. And after testing it they finally released only just this month. I have tried also this feature before writing this article and I think this will be a new hit for all the Blogger fanatic.

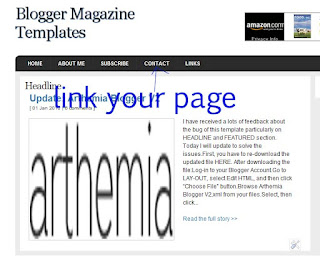
Creating pages is like writing a post too. The only difference is that in pages, you have to get the link and connect it to the navigational bar.

INSTRUCTIONS & STEPS:

First, click the Posting | Edit Pages tab, then click New Page. (Note: you can create up to 10 pages.)


After publishing your page you can now view or edit the datas.


Now, copy the link.


Go to LAY-OUT | Edit HTML and paste the link to the navigational bar, the Save.

There are also other way of using this feature, instead of linking you can do it as a widget.You can decide which pages will be linked and in what order they will appear. You can also choose whether you want new pages to appear automatically in the Pages widget by checking or unchecking the box to the left of Add new Pages by default.

For more complete instruction follow this link


Stumble
Delicious
Technorati
Facebook
Digg

Blogger is undergoing a reconstruction

August 31, 2009 1 comments

As a result of the feedbacks that Blogger got from their avid subscribers/users, they are now undergoing a quite reconstruction by adding some gadget that was long time have been used.

There are lots of this Label Cloud HTML code that circulating around the cyberspace. Sometimes they are difficult to set-up or a little bit tricky to all beginners.

Label 1-1

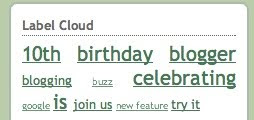
Blogger had simplified this cloud by adding a gadget. You can configure the labels, instead of using the normal way (list) you can now select the cloud button.

label 2

Like the normal label cloud, which ever label had the major usage it has the bigger font and the least used is the smallest one.

label 3

We can also select which label we want to show by simply checking the list, unlike the traditional one where in it shows all.

I hope Blogger will be adding some major gadgets soon. How about Picture Caption, Drop Cap, Static Pages, etc? I know you wanted also this.

Stumble
Delicious
Technorati
Facebook
Digg

Centering your Google Adsense Widget

June 21, 2009 4 comments

Google AdsenseGoogle Adsense

Its been my problem in the past that all the Google Adsense widgets that I put on a sidebar are always displaying on the left side portion.

And it takes me to long to tweak a solution for centering a widget. I tried all my knowledge in CSS but nothing have worked.

Again I will share to you the trick:

1. Log-in to your Blogger Account.

2. Go to Lay-out, Edit HTML.

3. Click Expand Widget Templates.

4. Look for the sidebar field that you want to edit. (eg. <div id='sidebar-ads'>>)

5. And a few lines after that you will see: <div class='widget-content'>

6. Now, insert this code.

align='center'

7. Should look like this:

<div align 'center' class='widget-content'>

8. Save.

Stumble
Delicious
Technorati
Facebook
Digg

How to install JS-Kit in Blogger

June 18, 2009 4 comments

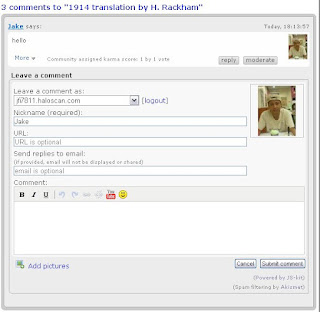
JS-Kit Installation,Haloscan
When JS-Kit acquires Haloscan I have discontinued using their services because of feeling uneasiness about their services, specially when integrating this into a template. Unlike Haloscan before, there no complication of copying and pasting, it automatically update your comments.

But since Wordpress have also shifted in using this comment platform from their typical embedded comment form and they added gravatars which makes this more fitted to the subscribers, I think it would also be the right time to review it and incorporate this to my next template.

Up to now, I can't find a detailed explanation on how to install JS-Kit Comment. And I hope this article of mine can help those who are looking for a step-by-step guide.

STEPS:

1. Sign-up for free account to JS-Kit (http://js-kit.com)


2. Fill-up the require field.


3. Log-in to your new account.

4.Select "Comment" from the rest of the services they offer.

5. Click "INSTALLATION" button.

6. Under Pricing, select "JS-Kit Free".


7. Again Select "Installation" from the menu.


8. Click "add new site".


9. select the code(universal code).

10. Log-in to your Blogger Acount.

11. Go to Lay-out, Edit HTML.

12. Click "Download Full Template" button.

13. Using control F in your keyboard, search this code:

<div class='post-footer-line post-footer-line-1'>

14. Replace below codes using our code that we acquire from JS-kit.
<span class='post-author vcard'>
<b:if cond='data:top.showAuthor'>
<data:top.authorLabel/>
<span class='fn'><data:post.author/></span>
</b:if>
</span>

<span class='post-timestamp'>
<b:if cond='data:top.showTimestamp'>
<data:top.timestampLabel/>
<b:if cond='data:post.url'>
<a class='timestamp-link' expr:href='data:post.url' rel='bookmark' title='permanent link'><abbr class='published' expr:title='data:post.timestampISO8601'><data:post.timestamp/></abbr></a>
</b:if>
</b:if>
</span>

<span class='reaction-buttons'>
<b:if cond='data:top.showReactions'>
<table border='0' cellpadding='0' cellspacing='0' width='100%'><tr>
<td class='reactions-label-cell' nowrap='nowrap' valign='top' width='1%'>
<span class='reactions-label'>
<data:top.reactionsLabel/></span>&#160;</td>
<td><iframe allowtransparency='true' class='reactions-iframe' expr:src='data:post.reactionsUrl' frameborder='0' name='reactions' scrolling='no'/></td>
</tr></table>
</b:if>
</span>

<span class='star-ratings'>
<b:if cond='data:top.showStars'>
<div expr:g:background-color='data:backgroundColor' expr:g:text-color='data:textColor' expr:g:url='data:post.absoluteUrl' g:height='42' g:type='RatingPanel' g:width='280'/>
</b:if>
</span>

<span class='post-comment-link'>
<b:if cond='data:blog.pageType != &quot;item&quot;'>
<b:if cond='data:post.allowComments'>
<a class='comment-link' expr:href='data:post.addCommentUrl' expr:onclick='data:post.addCommentOnclick'><b:if cond='data:post.numComments == 1'>1 <data:top.commentLabel/><b:else/><data:post.numComments/> <data:top.commentLabelPlural/></b:if></a>
</b:if>
</b:if>
</span>

<!-- backlinks -->
<span class='post-backlinks post-comment-link'>
<b:if cond='data:blog.pageType != &quot;item&quot;'>
<b:if cond='data:post.showBacklinks'>
<a class='comment-link' expr:href='data:post.url + &quot;#links&quot;'><data:top.backlinkLabel/></a>
</b:if>
</b:if>
</span>

<span class='post-icons'>
<!-- email post links -->
<b:if cond='data:post.emailPostUrl'>
<span class='item-action'>
<a expr:href='data:post.emailPostUrl' expr:title='data:top.emailPostMsg'>
<img alt='' class='icon-action' height='13' src='http://www.blogger.com/img/icon18_email.gif' width='18'/>
</a>
</span>
</b:if>

<!-- quickedit pencil -->
<b:include data='post' name='postQuickEdit'/>
</span>


15. Now click preview, if there are no errors then proceed.

16. Save.

Stumble
Delicious
Technorati
Facebook
Digg

How to add "Share This" button?

April 14, 2009 0 comments


Social bookmarking button is now commonly use on our blog but some still don't know where to place it and sometimes buttons were not properly added to their respective positions and places.

Here is my clearer version of tutorial:

  • First, go to "Lay-out/Edit HTML".
  • Click "Expand Widget Templates"
  • Using Control F in your keyboard, Search this code:  <data:post.body/>
  • Copy and Paste this code before the above searched html.


<div style='float:right'><script src='http://w.sharethis.com/button/sharethis.js#publisher=aa79922b-5642-48c7-8763-0d4f68890e62&amp;type=website&amp;buttonText=Share%20This%20Post&amp;embeds=true&amp;style=rotate&amp;post_services=facebook%2Cdigg%2Cdelicious%2Cybuzz%2Ctwitter%2Cstumbleupon%2Creddit%2Ctechnorati%2Cmixx%2Cblogger%2Ctypepad%2Cwordpress%2Cgoogle_bmarks%2Cwindows_live%2Cmyspace%2Cfark%2Cbus_exchange%2Cpropeller%2Cnewsvine%2Clinkedin' type='text/javascript'/></div>

Note: This position is to place the button on the right side position below the title of the post. You can also edit if you don't want to be on the right side by simply removing the "float:right".

  • Then, Save.


But if you want to place at the bottom part of the post, just put the code after <data:post.body/>, then save.

Stumble
Delicious
Technorati
Facebook
Digg

How to Set-up Feature Post?

March 1, 2009 0 comments

Feature Post
Some of the templates that are converted from Wordpress to Blogger require a manual set-up to install al the widgets and takes hours every time we want to update. I've found a widget which application is to show the Recent Post of the blog. From this, I came up with a Feature Post Widget that will automatically update every time we post an article for feature.

Copy and Paste this code

<script language="JavaScript">
imgr = new Array();

imgr[0] = "http://jake.ilac.googlepages.com/thumb1.jpg";
imgr[1] = "http://jake.ilac.googlepages.com/thumb2.jpg";
imgr[2] = "http://jake.ilac.googlepages.com/thumb3.jpg";
imgr[3] = "http://jake.ilac.googlepages.com/thumb4.jpg";
imgr[4] = "http://jake.ilac.googlepages.com/thumb5.jpg";

showRandomImg = true;


tablewidth = 248;
cellspacing = 8;
borderColor = "#ffffff";
bgTD = "#ffffff";

imgwidth = 550;
imgheight = 350;

fntsize = 12;
acolor = "#666";
aBold = true;
icon = " ";

text = "comments";

showPostDate = false;

summaryPost = 150;
summaryFontsize = 11;
summaryColor = "#666";
icon2 = " ";

numposts = 1;

label = 'features'

home_page = "http://YOUR-BLOG-ADDRESS";

</script>
<script src="http://jake.ilac.googlepages.com/feature.js" type="text/javascript"></script>


You can specify your desire sizes of the imgwidth and imgheight. Hope this codes help you. Please don't hesitate to comment when you have some queries.

Download Javascript File Here

Stumble
Delicious
Technorati
Facebook
Digg

Horizontal Flickr Badge Widget

February 13, 2009 0 comments

There are lots of website now that offer services on storing photos online and one of them is Flickr which owned by Yahoo. It was on 2006 that I manage to save some of my precious photos with them. But never known what should I do with this file of photos, I never intended to show it on public and keep them on my storage. Soon I discover that it can also be customized and included on my blog but the problem is, it was only available on vertical position.

It was a challenge for me convert into horizontal position. At first, it gave me headaches and almost I quit due to desperation. But if I didn't pursue to do it I can't get what I want. And it was  blessing that, when I tested it in Wordpress, it works also. So here's the codes:

For Blogger Account:

1. Go to "Lay-out/ Edit HTML"
2. Copy this code:

/* ----- FLICKR ----*/
.flickr_badge_image { float: left; }
#flickr_badge_wrapper { width: auto; border: 1px; }
#flickr_badge_uber_wrapper { width: auto; }

before

</b:skin>


4. Go to "Page Elements". Add "HTML/Javascript" to anywhere you want the photos to be seen. Copy this code:

Horizontal Flickr Badge

5. Change the "user" of the javascript. You can get your username by logging to http://idgettr.com/

6.Then Save.

PREVIEW RESULT:

Horizontal Flickr Preview

Stumble
Delicious
Technorati
Facebook
Digg